Installing the Well
Once the initial community engagement and education has been completed, and any community contributions have been collected, it is time to get the drilling equipment on site to start drilling.
In most countries, before you are allowed to drill holes into the ground you need to have a survey done by a geologist. In the case of a water well, a hydro-geologist performs a survey that reveals the types of rock one is likely to find as the drill bores into the earth. They also mark the specific locations where the team will have the best chance of finding a good supply of water.
Once that's done, it is generally necessary to get permission from the government, which often comes in the form of a permit to drill. Only after these final steps are complete, is the team ready to go.
The survey and permit process can seem cumbersome, and indeed in some cases it is. But it is also a good opportunity to engage with the local government to ensure that everyone, from village to drilling team to local politicians, are on the same page. As trust develops, many good things can flow in addition to safe water.
Drilling the Well
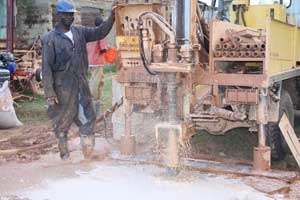
Drilling boreholes can be done in a few different ways, using different rigs. In our case we'll share what it's like to use a method called "rotary mud pump drilling" as an example.
Without getting too "deep" into this (sorry!), rotary mud pump drilling involves a rotating drill head being pushed into the ground, and adding more "stems" onto the drill pipe as you get deeper. Water is flushed through the stems, and out through the drill bit at the bottom of the hole as the drilling head is spinning and cutting. This water has been mixed with a substance that makes it thick and viscous. As the water comes back out of the top of the hole, it carries with it all the bits of rock and soil that have been broken up by the drill bit. For this process to work, you need to have a good water supply close by, because as you get deeper you require more and more water to make sure it brings the bits out the top.
Once the borehole has been cased (a lining that prevents the hole from collapsing shut) with plastic 6 inch PVC pipe, gravel is then poured down the hole. This needs to cover the outside area of casing which is "screened". The screen is basically many slots cut into the casing to allow water to move through the casing so it can be pumped up the inside. The gravel acts as a filter and stops any large bits of dirt moving into the well from the surrounding rock and the soil above.
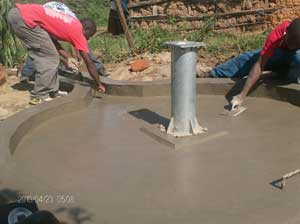
The top three meters of the borehole need to be sealed, to stop contamination moving into the water supply from the surface. Concrete is poured between the casing and the edge of the borehole to serve this purpose.
From there, the ground around the hole needs to be dug down about a foot, and crushed rocks or bricks packed to a depth of about six inches. It is then time to mix up the concrete, and create a circular platform around the well. The concrete needs about 10 days to harden.
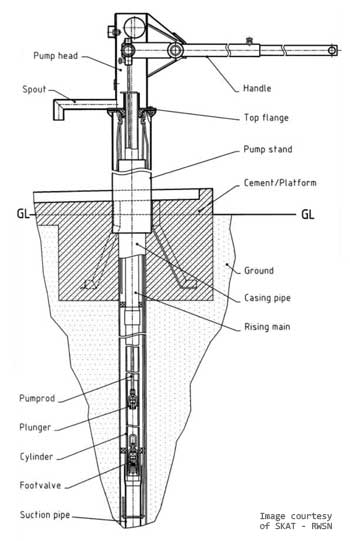
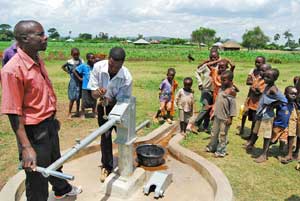
Finally, a hand pump needs to be installed. Our partners use Afridev handpumps, because they are locally available and have proven over many years that they are durable and practical. A "rising main" is installed down the plastic casing. This is a much smaller tube, about 1 1/2 inches in diameter. At the bottom of the tubing a valve is installed, which as it moves up and down with the action of the handle on the surface steadily draws water up the tube. This valve is attached by "stems" to the pump body and handle on the surface. Once the pump body has been attached the installation is complete. Water flows.
« Previous Step: Community Education | Next Step: Handing over the Well »